


How SMS Marketing Can Boost Your Real Estate Business (Using Constant Contact)
A Virtual Private Network (VPN) is an essential tool for ensuring your online privacy and security. With NordVPN, you can protect your data from hackers, cybercriminals, and even government surveillance. The service does this by encrypting your internet connection and routing your traffic through secure servers located worldwide.
However, simply downloading and connecting to NordVPN is not enough to guarantee the best performance or security. To truly make the most of NordVPN, it’s crucial to understand its settings and configure them to suit your specific needs. This is where things like choosing the right server, selecting a suitable VPN protocol, and enabling advanced features like Double VPN and Split Tunneling come into play.
Before getting into the optimal settings, let’s take a quick look at what NordVPN offers:
Understanding these basic features will help you make more informed decisions about which settings to enable for your needs.

Choosing the best VPN protocol is crucial for balancing speed and security. As mentioned earlier, NordVPN offers several protocols to choose from, each with its strengths and weaknesses.
NordLynx is typically the best choice for most users, as it strikes the right balance between speed and security. However, if you prioritize security over speed, OpenVPN (TCP) is the way to go.
The Kill Switch is a must-have feature for anyone serious about privacy. If your VPN connection drops for any reason, the Kill Switch will stop all internet traffic to prevent your real IP address from being exposed. This feature is crucial, especially when using public Wi-Fi networks or accessing sensitive information.
How to Enable Kill Switch:
There are two types of Kill Switch options available:
For the highest level of security, we recommend enabling the System-Wide Kill Switch to ensure all apps are protected.
Even though you are using a VPN, your DNS requests could still leak if your device isn’t properly configured. DNS Leak Protection ensures that all DNS queries go through NordVPN’s secure servers and prevent any accidental leaks.
How to Enable DNS Leak Protection:
DNS Leak Protection is automatically enabled in the app, but it’s always good to double-check. This feature will ensure that your true location and IP address stay hidden.
When using NordVPN, server selection is key. Connecting to a server that is too far from your location can result in slow speeds. To achieve the best possible performance, you should always aim to connect to a server that is geographically close to you.
However, for those looking to access content from another region, NordVPN’s extensive server network makes it easy to choose a server in your desired location.
| Server Location | Best For | Speed |
| United States | Streaming (Netflix, Hulu, Amazon Prime) | High |
| United Kingdom | BBC iPlayer, accessing UK content | Medium-High |
| Germany | General browsing, secure connections | High |
| France | Streaming, accessing French content | Medium |
| Australia | Gaming, streaming from Australia | Medium |
For streaming services like Netflix, connecting to servers in the United States or UK can ensure you get access to region-locked content. For privacy, consider connecting to a privacy-friendly country like Switzerland or Iceland.
If you are particularly concerned about your online privacy, Double VPN adds an extra layer of encryption by routing your traffic through two servers instead of one. This makes it extremely difficult for anyone to track your online activity.
How to Enable Double VPN:
Double VPN can slow down your internet speed because it encrypts your data twice, but the added security is worth it for those who want maximum privacy.
NordVPN’s CyberSec feature blocks intrusive ads, trackers, and malicious websites, which not only protects your privacy but also improves your browsing experience. This feature is especially useful when accessing websites with a lot of pop-ups or advertisements.
How to Enable CyberSec:
Once enabled, CyberSec will automatically block ads, malware, and phishing sites. It can also speed up your browsing experience by reducing the number of ads you see.
Split Tunneling allows you to route only some of your internet traffic through the VPN, while the rest of the traffic uses your regular, unprotected connection. This is especially useful for situations where you want to secure specific apps or websites while leaving others unaffected.
How to Enable Split Tunneling:
For example, you can route your streaming apps like Netflix or Hulu through the VPN while allowing your regular web browsing to use the local network. This helps preserve bandwidth for tasks that don’t require encryption.
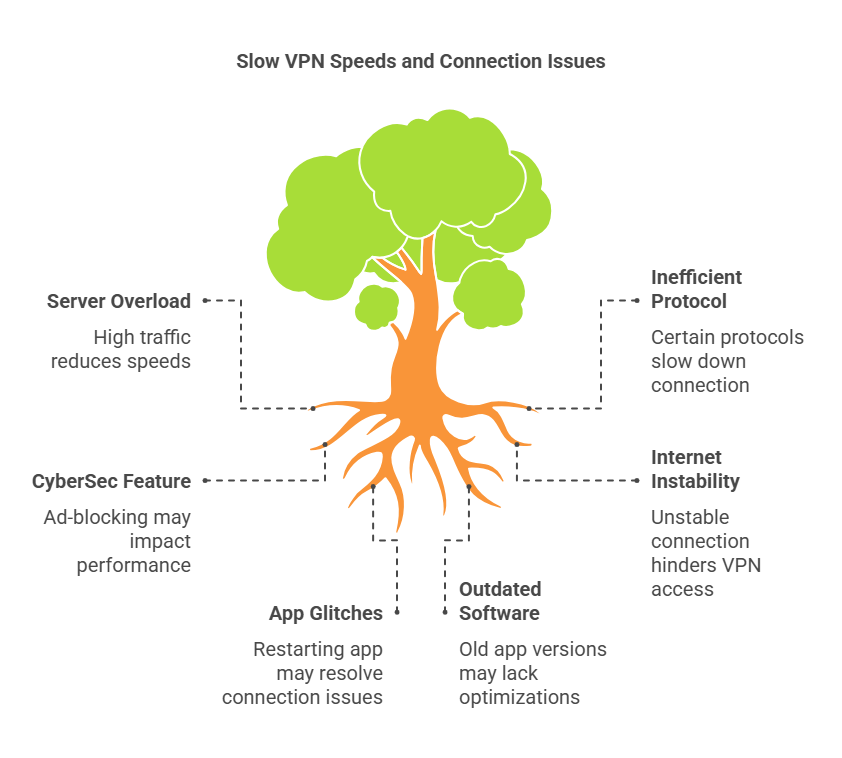
Despite the robust settings that NordVPN offers, users may occasionally encounter issues. Here’s how to troubleshoot common problems:
If you’re experiencing slow speeds with NordVPN, here are a few things you can try:
If you are having trouble accessing Netflix, Hulu, or other streaming platforms, it may be because they are blocking VPN traffic. Try connecting to a server in a different country, or use NordVPN’s Obfuscated Servers to mask your VPN traffic and bypass restrictions.
If NordVPN isn’t connecting, try the following:
MFA)**: Enable MFA for your NordVPN account for an added layer of security.
By fine-tuning these settings and features, you can maximize the effectiveness of your NordVPN subscription.
From selecting the optimal protocol to using advanced features like Split Tunneling and Double VPN, these settings help ensure that your internet experience is fast, secure, and private.

Discover thesaasifyhub.com, where we specialize in reviewing essential SaaS products like GetResponse and FreshBooks. Our mission is to assist you in finding the best digital tools to streamline your operations and drive growth. Let’s explore together!
Welcome to thesaasifyhub.com – where SaaS meets simplicity. Our journey began with a simple mission: to make the world of SaaS accessible, understandable, and beneficial to everyone. We dive into products like GetResponse, QuickBooks, FreshBooks, CuraDebt, and AppSumo, cutting through the noise to deliver honest, insightful reviews.
© 2024 TheSaasifyhub, All right reserved.